SSO Authentication Setup - ADFS
Below you will find requirements and instructions for enabling ADFS SSO for your organization using the Enterprise Management Interface.
Access Requirements
- Administrative rights to your Beam organization.
- Administrative rights to your ADFS server.
Enabling SSO Authentication
Begin by enabling AD FS authentication for your Beam organization.
- In a separate browser tab, log in to Your Account.
- You will be redirected to the Advanced Beam Management Dashboard.
- Select Organization from the main menu.
- Select Authentication from the section menu to view your Authentication Settings.
- Under Authentication Method, click Change next to Beam and/or Google Accounts.
- Select ADFS, then Continue.
- You will need to enter the IP address or hostname of your AD FS server, then Continue.
- Next, you will be provided with the option to allow guests access. Allowing guest access will let users not managed by your identity provider be a part of your organization.
- Finally, you will be provided with the option to edit the message sent to all users within the Beam organization informing them of this change.
- Click Confirm and Send E-Mail when complete.
The following instructions will complete the setup on your AD FS server:
- Open your ADFS management console.
- Click on Add Relying Party Trust. This will open a setup wizard.
- For the Federation metadata address, enter this URL: https://app.suitabletech.com/sso/metadata/
- You can click through the rest of the wizard to completion. Note: Multifactor Authentication is supported
- Right-click on the newly added trust and select Edit Claim Rules.
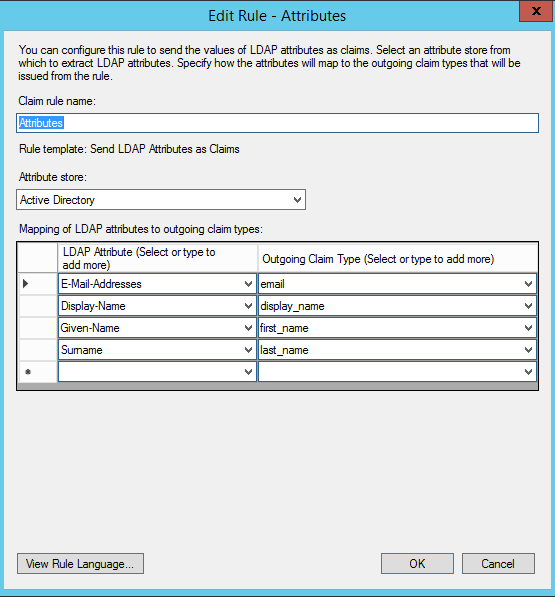
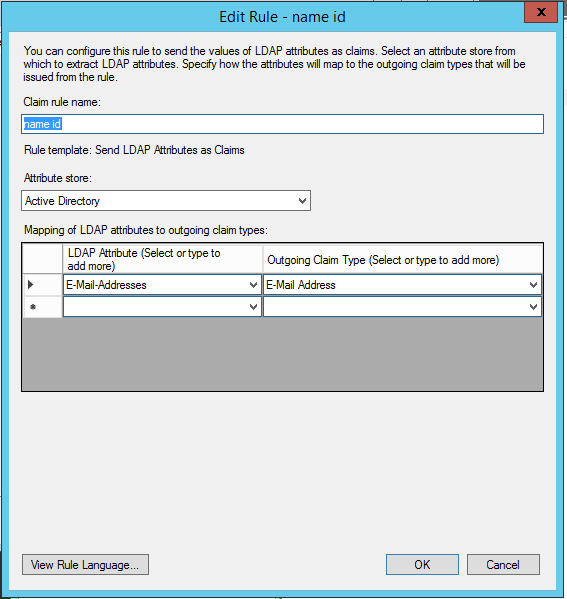
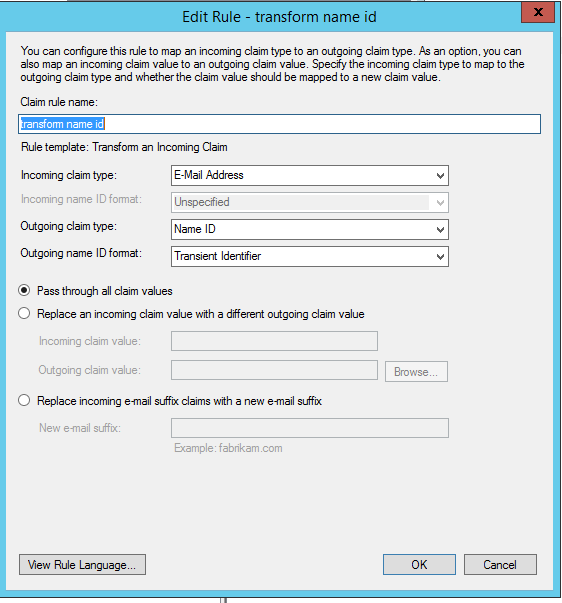
- You will now need to add three new claim rules: Attributes, name id, and transform name id. Please make sure that each rule created includes the exact information displayed in the following screenshots (the outgoing claim types are case sensitive):
- Attributes - this will follow the Send LDAP Attributes as Claims rules template
- name id - this will follow the Send LDAP Attributes as Claims rules template
- transform name id - this will follow the Transform an Incoming Claim rules template
- Attributes - this will follow the Send LDAP Attributes as Claims rules template
Domain Management
Finally, you must verify that your organization owns the domain associated with your user's email accounts. This can be done via DNS TXT or CNAME entry.
- Begin by selecting Add Domain.
- Enter the domain associated with your organization.
- Click Save Domain.
- A green notification box will appear indicating the domain has been successfully added.
- All domains must be verified with a DNS TXT or DNS CNAME.
Note: Domain verification may take a few hours after saving.- Verify with DNS TXT
- Select Verify with DNS TXT under Domain Management to view instructions for adding a TXT record to your host's DNS settings.
- Verify with DNS CNAME
- Select Verify with DNS CNAME under Domain Management to view instructions for adding a CNAME record to your host's DNS settings.
- Verify with DNS TXT
For additional information, email our Customer Success Department at This email address is being protected from spambots. You need JavaScript enabled to view it..