Configuring an Enterprise Network
The purpose of this article is to describe the Enterprise Wi-Fi Setup and User Interface, covering various configurations and features.
- Beam SPS running the latest firmware.
- USB flash drive with the following:
- Network certificate files (used for Advanced Configuration Only).
- User Private Key and Client Certificate (used for TLS Configuration Only).
- Certificate files in ASCII PEM (base64) encoded format.
- USB keyboard.
- Beam software version 2.15 and above.
- Compatible WPA/WPA2 EAP methods: EAP-PEAP/MSCHAPv2, EAP-PEAP/GTC, EAP-PEAP/MD5-Challenge, and EAP-TLS .
- *Important* Allow Beam outgoing and return traffic on UDP ports 6868 - 6871 to Suitable Technologies’ relay servers.
- 5 GHz WiFi network with good coverage across the Beam’s operating environment.
- Recommended 3Mbps upload and 3 Mbps download per Beam SPS.
- STUN compatible firewall.
- See the Beam Network Admin Guide for more information.
BASIC MODE
You will not need to copy your certificate files from a USB flash drive in basic mode. On the other hand, preloaded certificates are necessary for advanced mode.
- Navigate to the WiFi Setup mode via Keyboard.
- Search for Enterprise configured access point (AP) SSID.
- You will be presented with the Username and network Password screen:
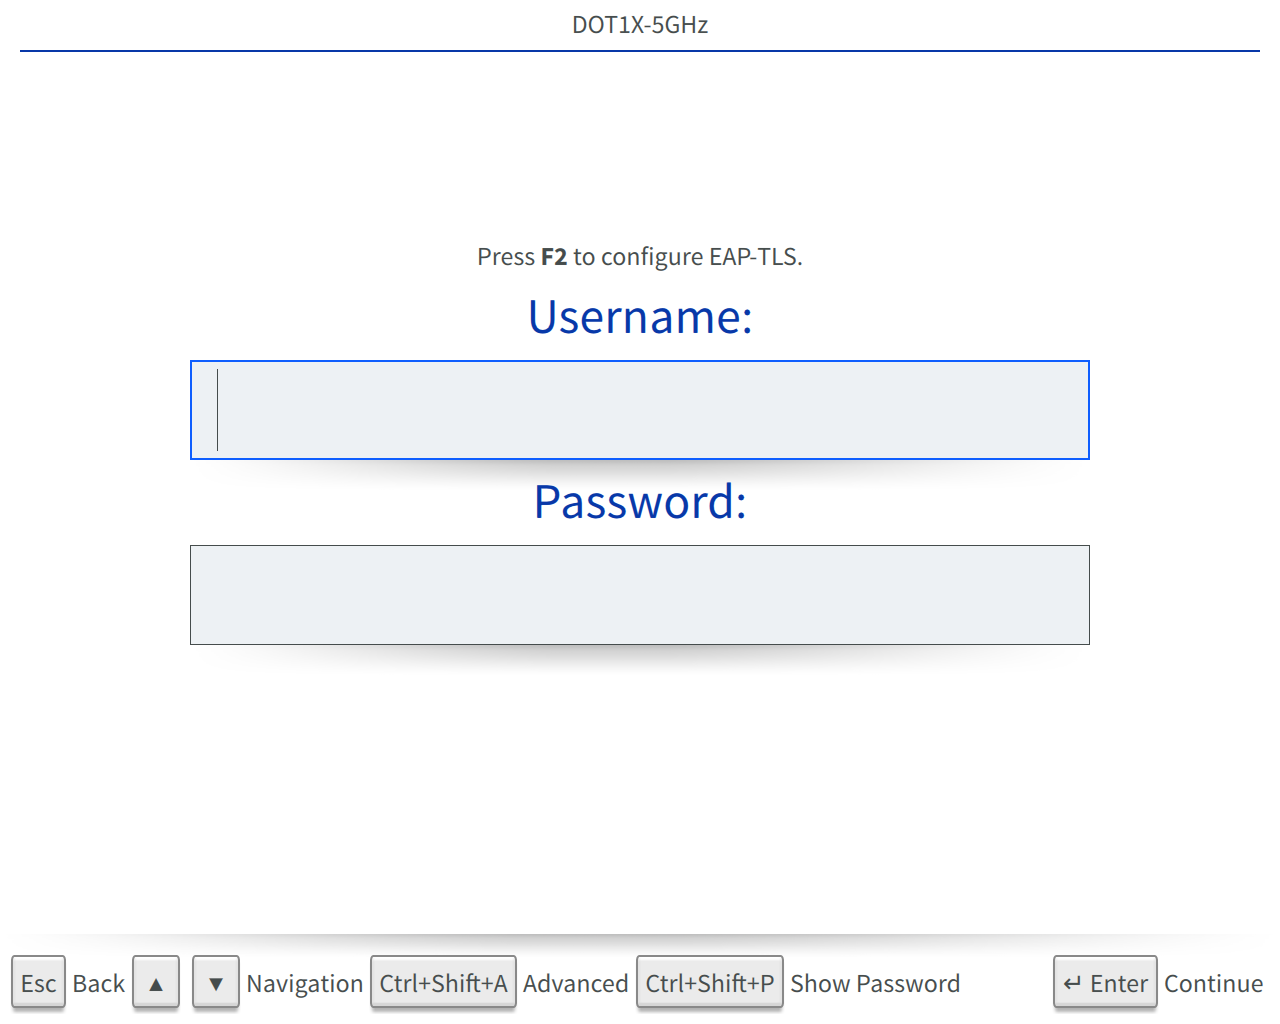
- Enter the Username.
- Enter the network Password.
- Press Enter on your keyboard.
- The Beam will contact the access point and request a copy of its network CA certificate over the air:
- If the Beam successfully retrieves the CA certificate, you will be presented with the following certificate verification screen:
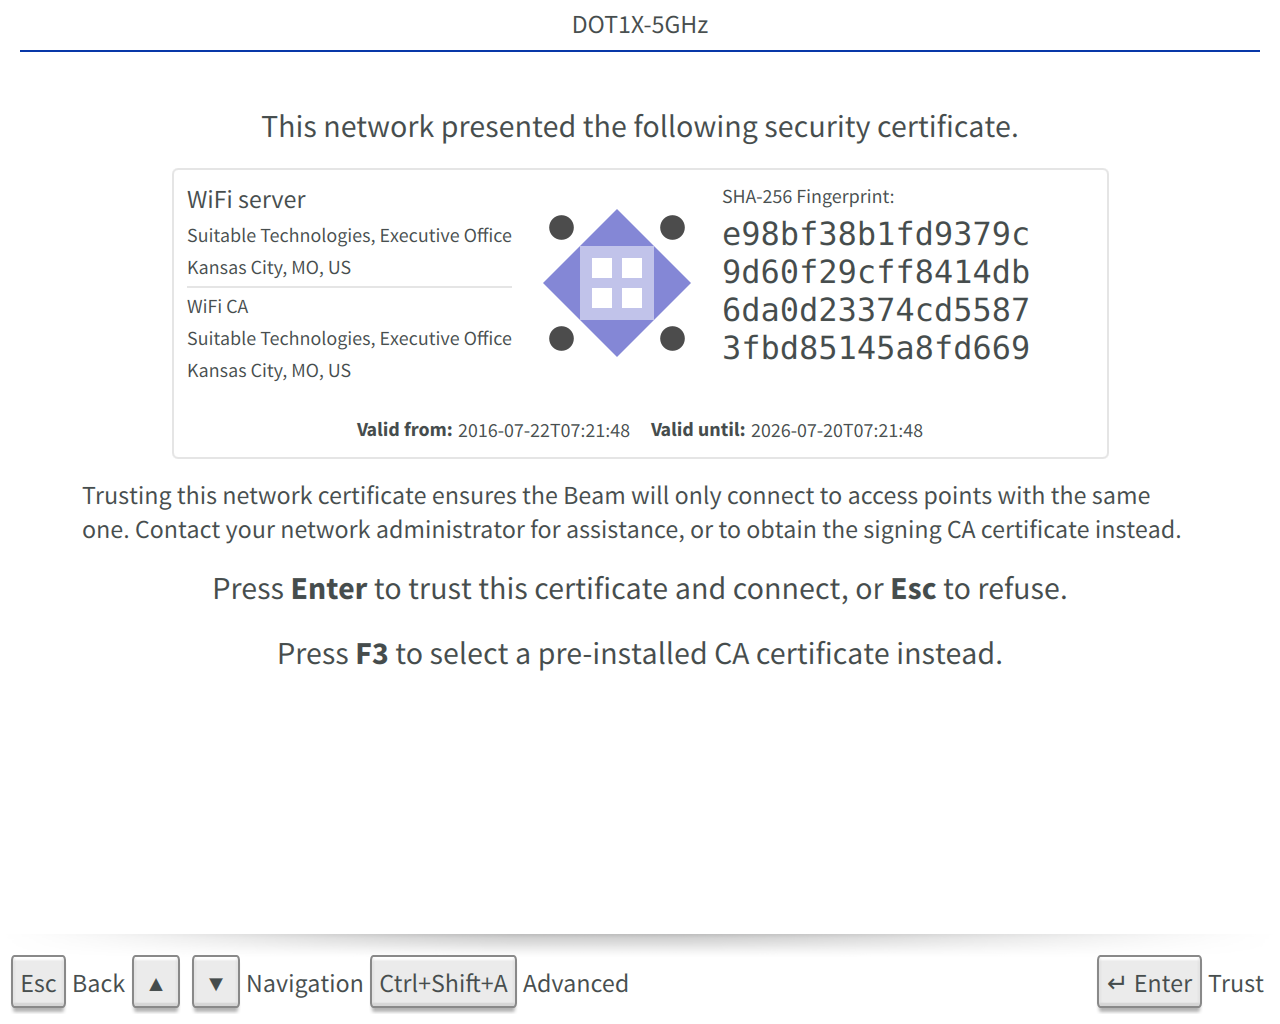
- If this is the first time connecting to this network, please verify the certificate fingerprint hash code with your network administrator. The image is generated from the hash code taken from the AP and can be used in subsequent connections to quickly verify a known AP. (Note: Contact your network IT administrator if the signature seems unfamiliar or you are unsure.)
- Select Connect and press Enter on your keyboard.
- If the Beam is unsuccessful in retrieving the CA certificate over the air, you will be presented with the option to select a preloaded certificate.

- Select a preloaded CA certificate from the drop-down menu.
- Select Connect and press Enter on your keyboard to verify the manually selected certificate.
- If the Beam successfully retrieves the CA certificate, you will be presented with the following certificate verification screen:
- After hitting the Enter key, the screen will show a spinning icon while your network authentication is being verified. A green check mark will be shown once the Beam has been successfully authenticated to the network.
For the TLS configuration, you MUST upload your private key, network CA certificate, and client certificate files. See how to copy USB based Client Certificates procedure HERE.
- Navigate to the WiFi Setup mode via Keyboard.
- Search for Enterprise configured AP SSID.
- You will be presented with the Username and network Password screen.
- To configure an EAP-TLS network, press F2 on your Keyboard. Pressing F2 again will toggle back to the PEAP-MSCHAPV2 configuration screen.
- You will be presented with the following EAP-TLS setup screen.
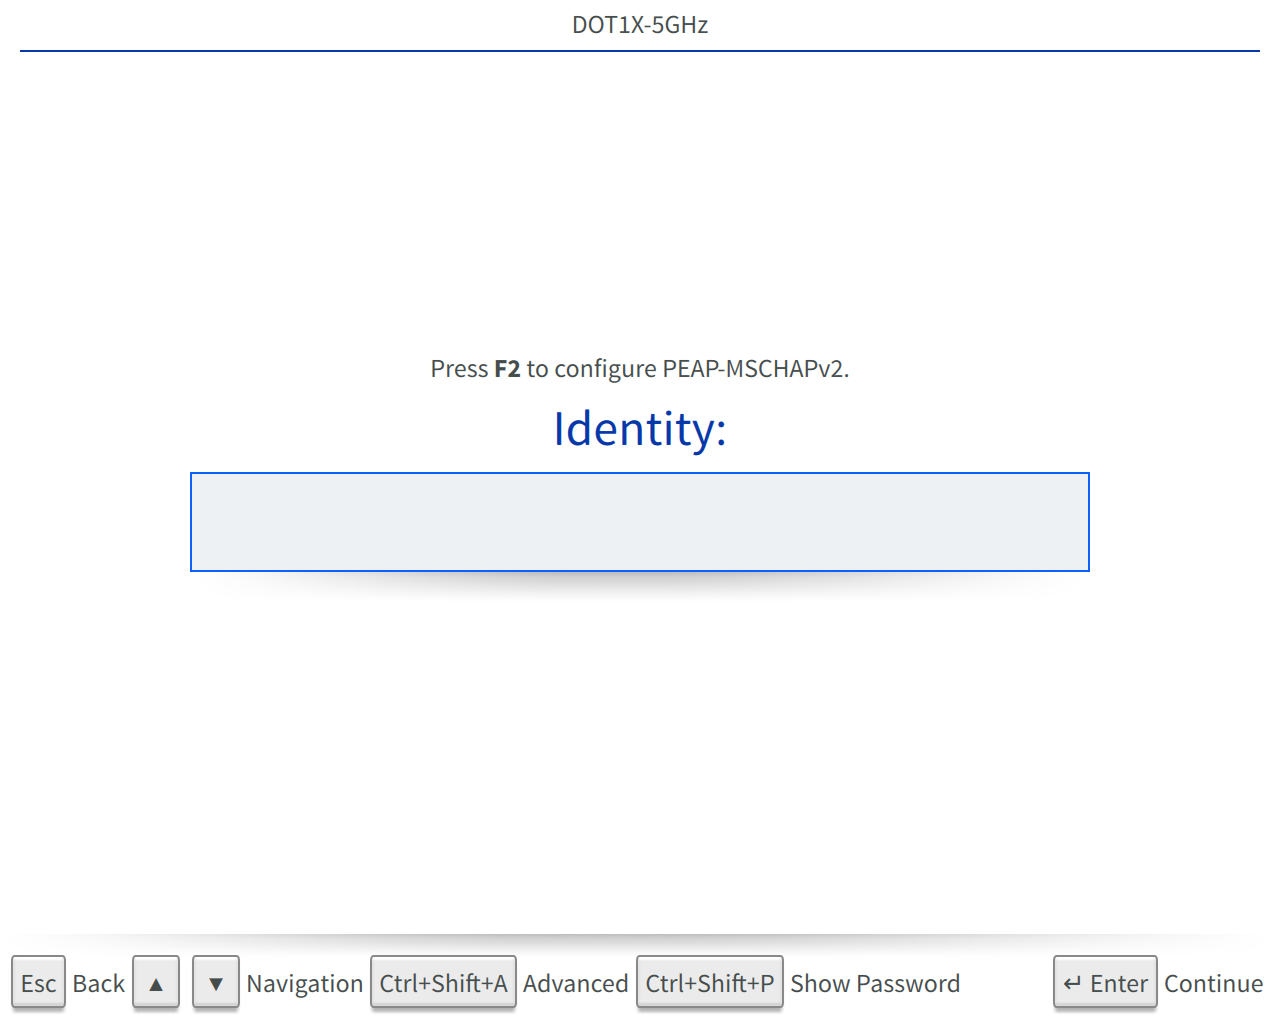
- Enter the Identity.
- Press Enter on your keyboard.
- On the next screen, you will get the option to select the private key and the client certificate. You may not need a password for User Private keys password (for encrypted keys), based on how the private key was created. Note: If you are unsure, attempt configuring with and without a password.
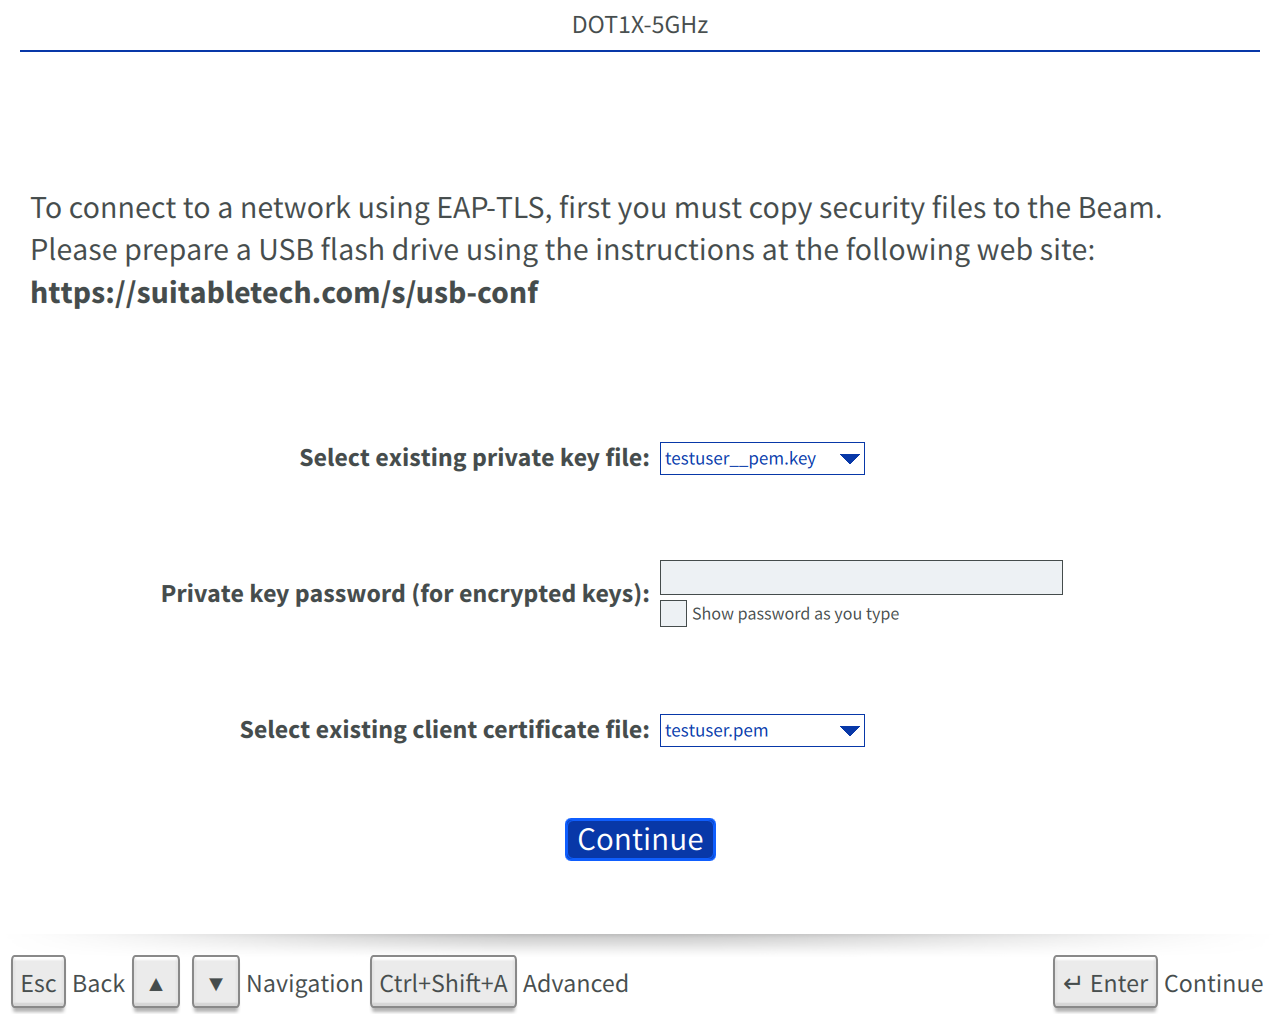
- Next, choose the Continue button.
- The Beam will attempt to retrieve the network CA certificate over the air:
- If the Beam successfully retrieves the CA certificate, you will be presented with a verification screen similar to the one below:
- If this is the first time connecting to this network, please verify the certificate fingerprint hash code with your network administrator. The image is generated from the hash code taken from the AP and can be used in subsequent connections to quickly verify a known AP. Note: Contact your network IT administrator if the signature seems unfamiliar or you are unsure.
- Choose Connect and press Enter to verify.
- If the Beam is unsuccessful in retrieving the CA certificate, you will then be presented with the option to select a preloaded CA certificate from the drop-down menu. If no certificate is listed, you will need to upload an ASCII PEM encoded certificate.
- Choose Connect and press Enter to verify the manually selected certificate.
- If the Beam successfully retrieves the CA certificate, you will be presented with a verification screen similar to the one below:
- After hitting the Enter key, the screen will show a spinning icon while your network authentication is being verified. A green check mark will be shown once the Beam has been successfully authenticated to the network.
ADVANCED MODE
We recommend configuring a Beam to an enterprise network through the Basic mode procedure above if possible. However, Advanced mode is available for use as needed.
Beam Configuration Process- Navigate to the WiFi Setup mode via the keyboard.
- Hit Ctrl+Shift+A to toggle to Advanced mode.
- Search for an Enterprise configured access point (AP) SSID.
- You will be presented with the following configuration page.
- Mark the Enabled check box if you would like for the Beam to use this network.
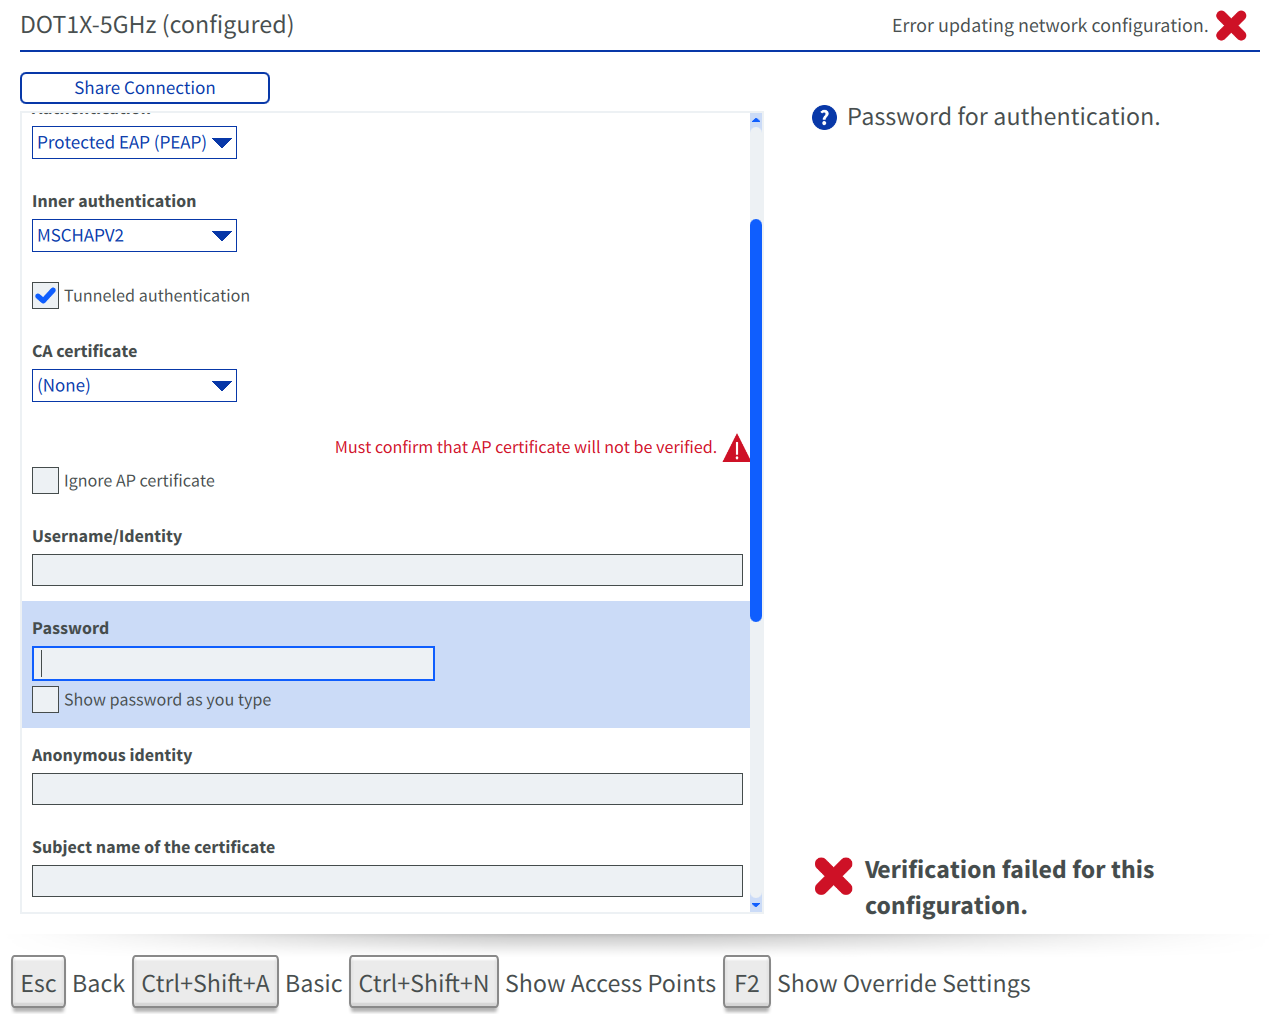
- For Security, select WPA or WPA2 Enterprise.
- Under Authentication, select the EAP method used on the network. If you are unsure, please check with your network administrator.
- For Tunneled TLS (TTLS) and Protected EAP (PEAP), you will get an additional two fields; Inner authentication and Tunneled authentication checkbox.
- If you are unsure which Inner authentication method to select, try MSCHAPV2 as it is the most commonly used type, otherwise, check with your network administrator.
- Mark the Tunneled authentication check box to enable tunneled authentication and to display a Password field.
- For Tunneled TLS (TTLS) and Protected EAP (PEAP), you will get an additional two fields; Inner authentication and Tunneled authentication checkbox.
- Choose a preload CA certificate.
- Mark the Ignore AP certificate field if you do not wish to verify the CA certificate. Caution: When enabled, the Beam will send its sign-on credentials to any AP with the expected SSID, even if the AP has a missing or invalid certificate.
- Enter the network Username/Identity.
- Enter the network Password and Anonymous identity (if any) when Tunneled authentication is enabled under TTLS or PEAP.
- Enter the Subject name of the certificate if one is necessary. Otherwise, leave this field blank or check with your network administrator.
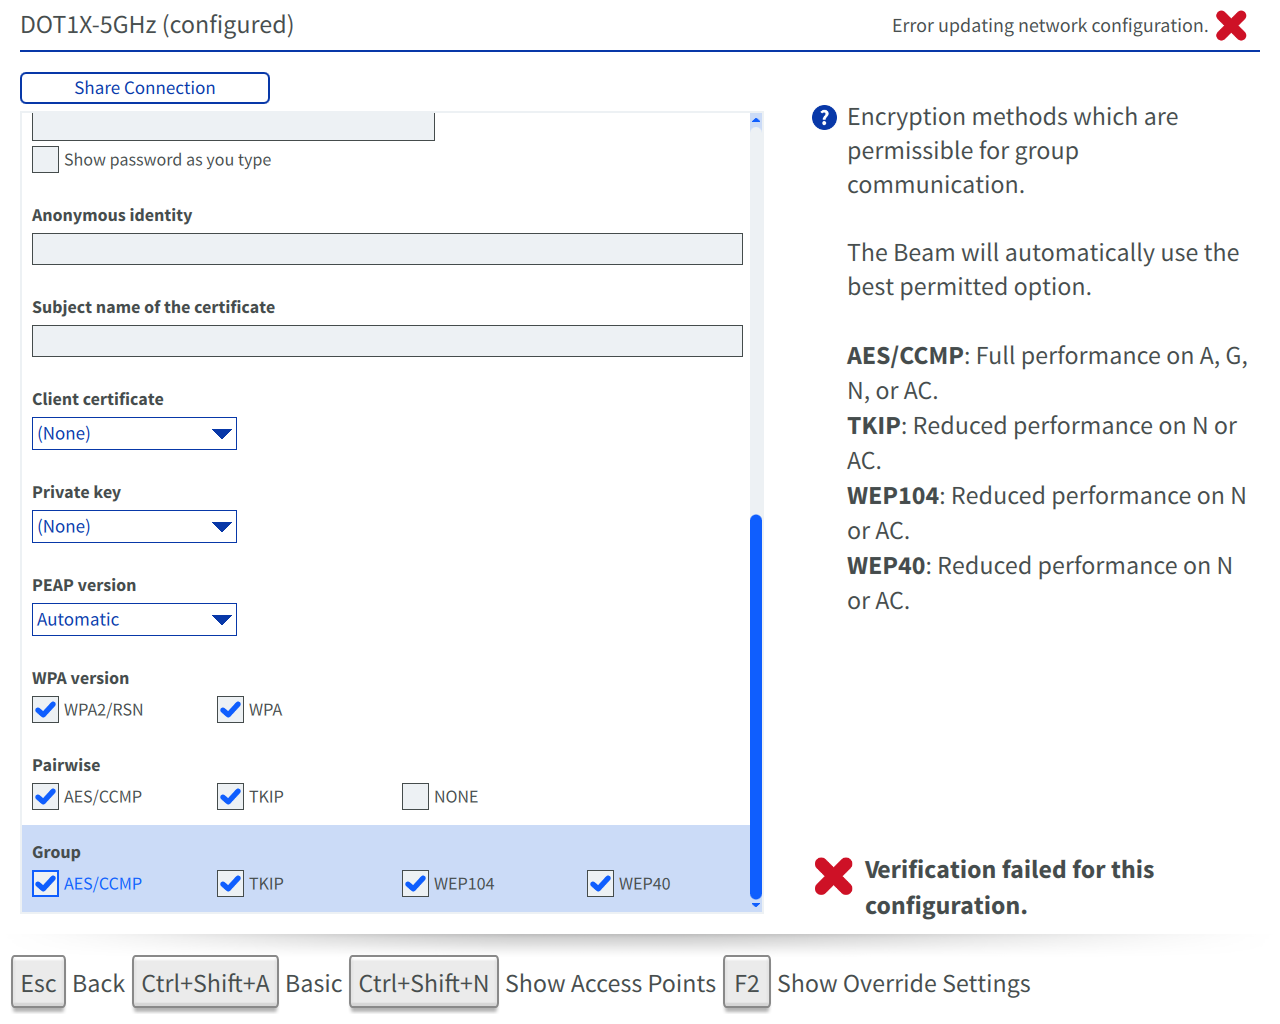
- Select the preloaded Client certificate if one is required.
- Select the preload Private key if one is required.
- Under PEAP version, the default option is Automatic. Select a specific option if you would like to force a PEAP version.
- Note: For WPA version, Pairwise and Group, we recommend leaving the default selections in place unless you are instructed to change them by your network administrator. The Beam will select the best available option.
- WPA Version: Version of WPA to use.
- WPA2/RSN: Full performance on A, G, N, or AC.
- WPA: Reduced performance on N or AC.
- WPA version: Encryption method which is permissible for individual communication.
- CCMP: Full performance on A, G, N, or AC.
- TKIP: Reduced performance on N or AC.
- NONE: No encryption.
- Group: Encryption methods which are permissible for group communication. The Beam will automatically use the best-permitted option.
- AES/CCMP: Full performance on A, G, N, or AC.
- TKIP: Reduced performance on N or AC.
- WEP104: Reduced performance on N or AC.
- WEP40: Reduced performance on N or AC.
- Once the appropriate fields are filled out, network authentication and verification will follow. The Beam will display errors if authentication fails. A green check mark will be shown once the Beam has been successfully authenticated to the network.
- Occasionally, authentication may fail due to blocked UDP ports (6868 - 6871). Ensure that Beam is allowed to communicate through these ports.
- If you see "WPA2-Enterprise authentication has failed..." error message, try unplugging the USB keyboard to see if the Beam successfully completes the authentication handshake process.
- EAP-TTLS is deprecated and no longer supported on Beam.
For additional information, email us at sThis email address is being protected from spambots. You need JavaScript enabled to view it..